So recently we decided to incorporate SonarQube into our development workflow as part of improvements we’re doing in the way we build software at Thoucentric.
For those who aren’t familiar, SonarQube is like your smart code quality watchdog. It’s a nifty tool that analyses your code, sniffs out any bugs, vulnerabilities, or code smells, and gives you a heads up on how to make your code better. This is different from let’s say linting or any unit testing that you’d do on your own machine.
The goal
The way we wanted things to be is that with each push to the dev branch a code scan should take place which would basically generate a report that a developer can then look into and get inputs on any bugs, vulnerabilities and code smells present in the code. And since we’re using Azure DevOps to host all of our repos it made sense to integrating SonarQube into our build pipelines.
The Setup
SonarQube plays nicely with Azure DevOps, and here I am assuming that a SonarQube server is already setup and running. We are using an instance of SonarQube that’s hosted on the Azure App Service, you can find a ready to deploy version in this git repository
Before we get down to the integration we need to ensure that SonarQube and Azure DevOps can talk to each other. To do that you need to setup the global DevOps Platform settings and add a PAT for importing repositories.
Setting your global settings
To import your Azure DevOps repositories into SonarQube, you need to first set your global SonarQube settings. Navigate to Administration > Configuration > General Settings > DevOps Platform Integrations, select the Azure DevOps tab, and click the Create configuration button. Specify the following settings:
- Azure DevOps collection/organization URL: If you are using Azure DevOps Server, provide your full Azure DevOps collection URL. For example,
https://ado.your-company.com/DefaultCollection. If you are using Azure DevOps Services, provide your full Azure DevOps organization URL. For example,https://dev.azure.com/your_organization. - Personal Access Token: You need a personal access token from this account with the scope authorised for Code > Read & Write for the repositories that will be analysed.
Adding a personal access token for importing repositories
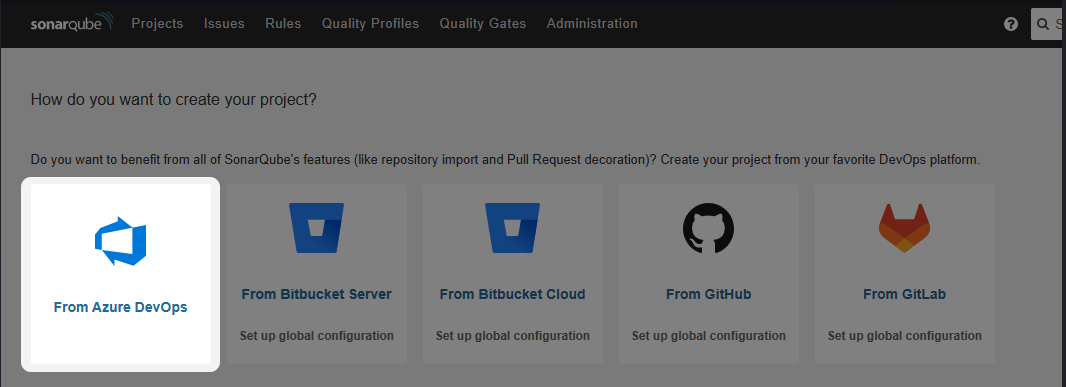
After setting your global settings, you can add a project from Azure DevOps by clicking the Add project button in the upper-right corner of the Projects homepage and selecting Azure DevOps.
- Click the “Add project” button on the top-right corner of the Projects homepage.
- Choose “Azure DevOps” from the options.
- Provide a personal access token with
Code (Read & Write)scope.
After saving your personal access token, you’ll see a list of your Azure DevOps projects that can be set up and added to SonarQube.
Setting up Azure DevOps
On the Azure DevOps side we need to install the SonarQube extension from the Visual Studio Marketplace: SonarQube extension
After installing your extension, you need to add your SonarQube server as a service endpoint in your Azure DevOps project settings:
- In Azure DevOps, navigate to Project Settings > Service connections.
- Click on “New service connection” and choose “SonarQube” from the service connection list.
- Provide your SonarQube Server URL, an authentication token (You can generate new tokens at User > My Account > Security inside SonarQube) and a name for the service connection.
- Select “Save” to save your connection.
The Pipeline
To set up the pipeline, it is important to consider the type of project you are working on. The build process and code scanning method will vary depending on the technology stack used. As the majority of our code here in Thoucentric is in Python, we will primarily utilise the SonarScanner CLI. This configuration is defined by the scannerMode parameter in the pipeline code
trigger:
- dev  # Specifies that the pipeline should be triggered on the 'dev' branch

pool:
  vmImage: ubuntu-latest  #virtual machine image to be used for the pipeline

steps:
  - task: SonarQubePrepare@5  # Prepares SonarQube for analysis
    inputs:
      SonarQube: 'SonarQube-SVC'  # Specifies the name of the SonarQube service connection to be used,this is something we set up earlier
      scannerMode: 'CLI'  # Sets the scanner mode to 'CLI' since ours is a Python codebase
      configMode: 'manual'
      cliProjectKey: 'PROJECT_KEY_HERE'  # the project key to identify the project in SonarQube
      cliProjectName: 'PROJECT_NAME_HERE'  # Specifies the project name in SonarQube
      cliSources: '.'  # Specifies the source code path to be analyzed

  - task: SonarQubeAnalyze@5  # Runs the SonarQube analysis on the specified source code

  - task: SonarQubePublish@5  # Publishes the SonarQube analysis results
    inputs:
      pollingTimeoutSec: '300'
You can use the code as is, just replace the cliProjectKey with the value from the Configure Analysis step in SonarQube
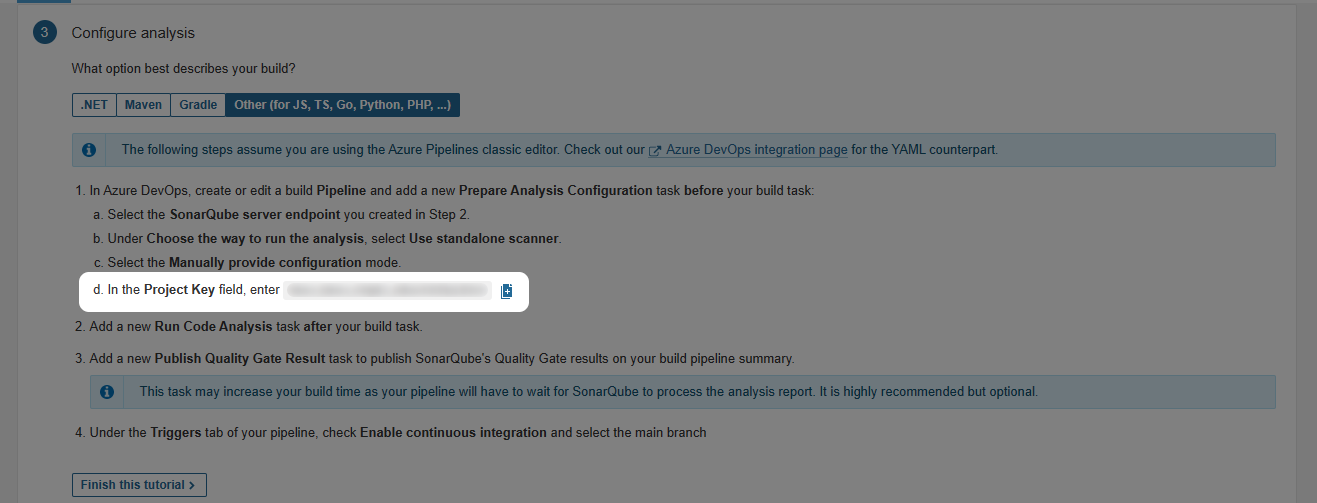
Once you’re done with making the changes, commit and push the yml file to the branch which will trigger the SonarQube analysis. It will take some time for the results to reflect on the SonarQube portal. You can modify the above code as you see fit and also include this as a single step in a larger pipeline.
With this setup all the new pushes on your branch will trigger a new analysis in SonarQube.